How the form editor works
The editor opens on the Fields tab, in three columns: the field palette down the left, your form in the middle, and the settings for whichever field you have selected on the right. The tabs across the top are Fields, Submissions, Settings and Danger.
The middle column is not a preview. It is the form, shown the way the people filling it in will see it. There is no save button on the Fields tab and no draft to lose: each change is written as you make it.
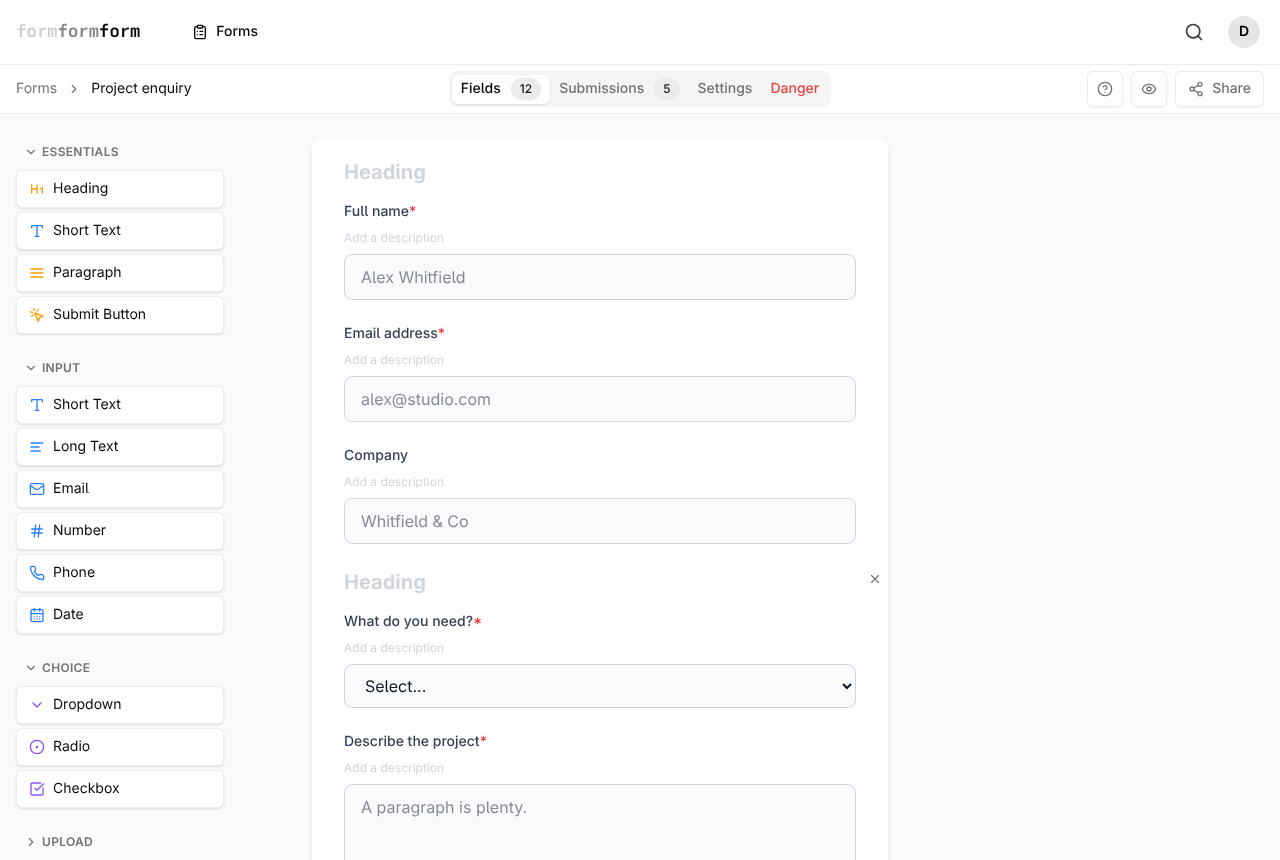
The three columns
The palette holds every kind of field you can add, grouped by what it does. Essentials has the handful most forms are built from; Input, Choice, Upload and Layout are there when you need something more specific.
The panel on the right only ever shows the settings the selected field actually has — a dropdown offers you options to edit, a heading does not. Click a field in the middle to open it, and the x at the top of the panel to close it.
On a narrow screen the columns stack: the palette moves behind an Add Field button above the form, and field settings slide in from the side when you tap a field.
Adding a field and putting it in order
Every field starts the same way: add it, rename it, then move it to where it belongs.
- 1
Open the Fields tab. The badge next to it is your current field count.
- 2
In the palette, open the group you want — Essentials, Input, Choice, Upload or Layout.
- 3
Click a field type to add it to the bottom of the form, or drag it in and release it where the dashed line appears.
- 4
Click the new field's label in the middle column and type over it. Press Enter to finish. The grey "Add a description" line underneath takes help text the same way.
- 5
Drag a field card up or down to change the order of your questions.
- 6
To remove a field, hover over it, click the small x in its top-right corner, then click Yes.
A form only needs one submit button, so reaching for a second opens the "How the editor works" tour instead of adding it. To change the wording, click the button already in your form and edit its label.
What the settings panel offers
Label, Description and a Required switch appear for anything that collects an answer. Dropdown, Radio and Checkbox add an Edit options link — type your choices, click Add for another, then Save. Short Text and Long Text take a Max length, Number takes Min, Max and Step, Date takes a Min date and Max date, and most question fields take a Field width.
At the foot of the panel, question fields have an Edit Logic button. That is where you say a field should only show, or only be required, when earlier answers match ALL or ANY of your conditions. A field carrying rules shows a small "Has logic" tag on its card.
File Upload takes one file per field, up to 2 MB. Heading, Paragraph, Divider and Image collect nothing — they display something and never appear in your responses.
The Settings tab
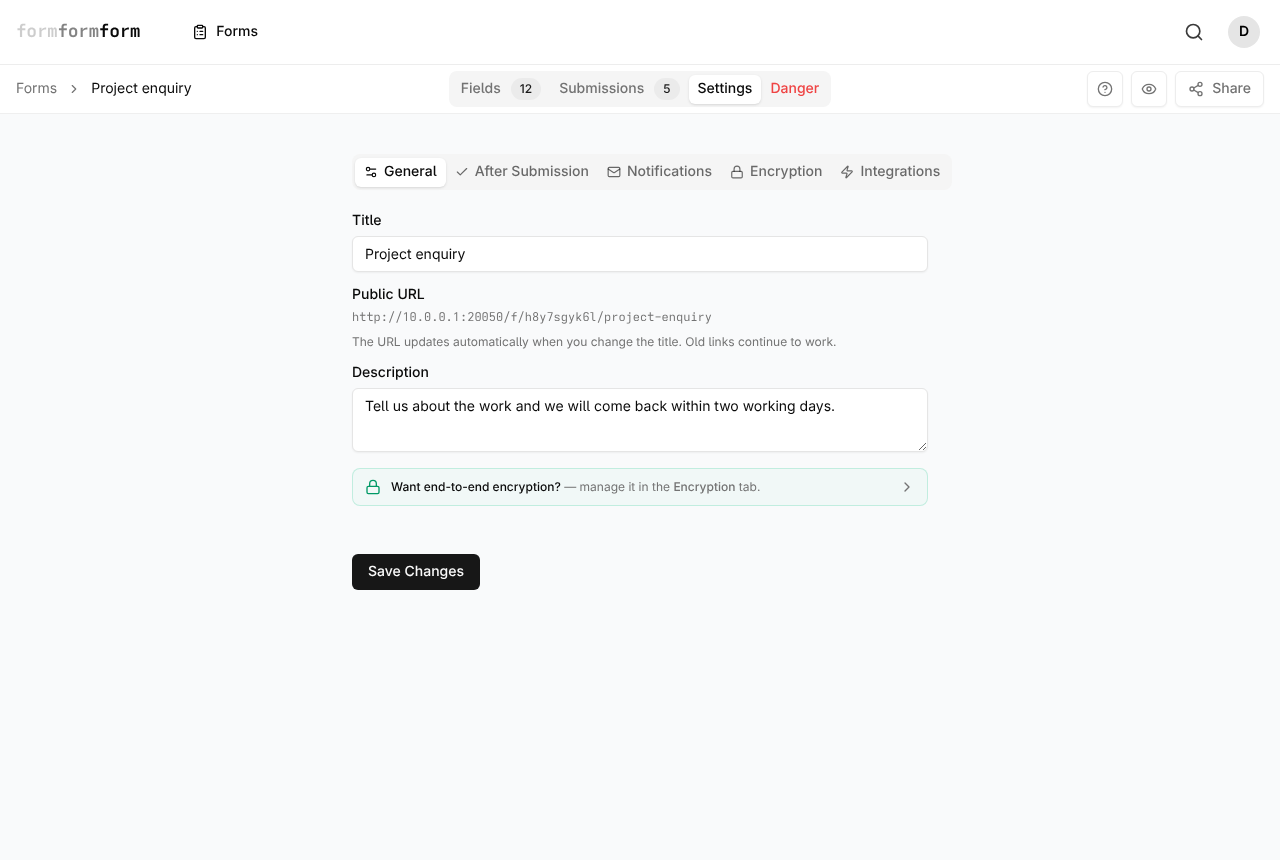
Settings has five sub-tabs. General holds the title, the description and the public URL, which follows the title while old links keep working. After Submission holds the thank you message and an optional redirect URL. Notifications carries the "Email me on new submissions" switch and the "Form is accepting submissions" switch that stops collection. Encryption manages end-to-end encryption, and Integrations is where webhooks and Zapier live.
This tab behaves differently from the Fields tab: nothing here is written until you press Save Changes.
Once a form has taken its first submission its encryption key is frozen — changing it would make existing responses unreadable, so to use a different key you duplicate the form. The private key is unrecoverable by design: lose it and every response stays unreadable, attached files included.
Previewing, sharing and deleting
The eye button in the top bar opens Form Preview: the form exactly as a respondent gets it. Share, beside it, gives you the link and the other ways to hand the form out. Nothing needs publishing — a form is live from the moment it is created.
The Danger tab has one control, Delete Form. It removes the form and all of its submissions permanently — no undo.
Frequently asked questions
Where is the save button in the form editor?
The Fields tab does not have one. Adding, renaming, reordering and deleting fields are written as you do them. The Settings tab is the exception: it saves when you press Save Changes.
Why won't the editor let me add a second submit button?
The submit button is the one people press to send their answers, so a form only needs one. Clicking Submit Button again opens the quick tour instead of adding a duplicate. Select the button already in your form to relabel it.
How do I split a long form into two pages?
Add a Page Break from the Layout group and drag it to the split point. Everything after it becomes a second page, with Next and Back buttons, and the submit button belongs on the last page.
Related articles
- Create your first form
From the New Form button to a link worth sending, in four passes through the editor.
- Every field type, and when to use it
A tour of the palette: what each field type collects, and which one fits the answer you want back.
- Show and hide fields with conditional logic
Add a rule to a field so it appears, or becomes required, only when an earlier answer calls for it.
- Split a long form across pages
Add page breaks from the Layout palette to turn one long form into a short sequence of numbered steps.
- Publish a form and get its link
A form is live the moment you create it — how to check it, copy its link, and close it again.
Nothing here answering your question? The editor is quick enough that trying it is often faster than reading about it.
Open the editor